m2mDirect v0.1.1 release

A long time ago I created m2mMesh, which was an Arduino library for a self-organising mesh network onESP8266/32 that allowed you to do machine-to-machine messaging.

This has been quite useful but sometimes it's overly heavyweight so I've written a simpler thing for direct links between two devices. Also with just two devices you can use the built in encryption features of ESP-NOW. Lack of encryption was always a concern with m2mMesh.

This new library is m2mDirect, which I intend to use for control/telemetry of the various rovers I've been working on.

It's not in the Arduino Library Manager yet as it needs more work, in particular ESP8266 support and channel negotiation, but it is now available on GitHub.

Obscure Arduino tips #5

Just today I spotted an excellent 'ease of use' thing in the Arduino IDE that Sparkfun had used in one of their examples. Maybe consider adding it to any code you are going to share.

There is a pseudo-URL you can add as a comment in code that will link to the Arduino Library Manager and search for a library.

For example

#include "SparkFun_TMF882X_Library.h" //http://librarymanager/All#SparkFun_Qwiic_TMF882X

This way if somebody has your code they can click on the link and be taken straight to an install option within the Arduino IDE.

This is a really nice little usability feature I had no idea existed.

I'll gloss over the fact Sparkfun originally typo-ed the link in the sketch in question. :-)

Trackable Lasertag sensor

As a partner piece to the PDT Tracker I needed to make some 'wearables' to go with it.

My original plan had been to take some of the PCBs made for the PDT Tracker and jury rig them into that wearable.

I did this in May but in the end the software wasn't ready for the event I needed them at and even had it been the game overran and we didn't get to the point where they were necessary.

So I've had a couple of months to come up with a wearable beacon and I decided to go for an MVP of my Lasertag 'holy grail' idea: a  Lasertag sensor that is remotely trackable and sends status updates.

I consider it a 'minimum viable product' because not only is the software a first attempt it relies on external modules for some of its features.

All the PCB has on it is an ESP32-C3 WROOM module, RFM95W LoRa module, LDO voltage regulator, a few passive components and solder headers for various things.

The GPS will always be a bought in module but relying on an external USB breakout, LiPo charger and sounder makes it bulkier than it otherwise might have been. I also put the components all on one side for easy soldering which gives it a fairly large 'footprint'.

Initial desk based testing with the board you can see above showed everything to work so I designed a quite utilitarian 3D printed enclosure and assembled four headband style sensors to test.

Convention in UKLTA is that sensors are worn on the head and this prototype ended up slightly bulkier than the commonly used sensors but with a LiPo inside rather than 3x AAA batteries it was no heavier.

Getting everything inside the case was fairly easy but construction of the headband which includes four IR sensors and four 3mm LEDs was quite tiresome. I'd opted to make little 3D printed enclosures for these and this really exacerbated struggles with getting the wiring done tidily.

In the end this all worked so I'm going to improve on the software between now and our next event in May 2024. I might do a second revision of the PCB with more functionality on-board but without a clear requirement for the system yet the four prototypes I have work and can be used to further test the concept.

One of the things that didn't get tested is haptic feedback, mostly because I was rushing and I didn't have a nice compact vibration motor to use. It's planned though as one of our members is hard-of-hearing and also I really like the haptic feedback in the Laserwar equipment I use at another LARP.

So far this post has been all about the process and the componentry but here's the concept I'm trying to realise.

  • Every participant in a LARP is location tracked, players, crew and 'monsters'
  • The 'health' of every participant in the LARP is tracked
Obviously this only makes sense in an outdoor LARP with an element of tactical combat but that's what I play.

The purpose of this is essentially to allow us to replicate the sort of thing you see in action sci-fi media where there are one or both or some combo of the following two things.
  • A 'tracker' that shows the relative location of friends/foes to players eg. the Alien/Aliens motion tracker
  • A 'squad status' system for squad leaders eg. the 'command desk' in the APC in Aliens that shows the 'health' of the squad.

This is all very mil-sim industrial sci-fi stuff but that's what I want from my games. In principle it should also be able to link the sensor to my prototype Lasertag weapon board using Bluetooth and show when a participant is firing, out of ammo etc.

I would also love to partner it with my HelmetCam prototype for the full Colonial Marines experience but the challenges of WiFi outdoors may make that impractical.

These ideas are taking a long time to come to fruition but I am slowly edging towards them. I bought the GPS modules used in this back in 2020.

eBike battery mount

Way back at EMFCamp I bought an eBike battery to use in a Rover. It came bare without a connector or mount. It took me a long time to get around to searching for a connector and ordered something from AliExpress.

When it arrived it was a disappointment. The connector was just about OK but the mount was rubbish and unusable.

Yesterday I finally got around to designing a 3D printed block to go on the supplied rail and hold the connector firmly in place, unlike the awful flimsy plastic pieces supplied.

I also had to drill the rail to make the locking mechanism work, but that came out OK.

Now I need to get on with the rest of the Rover.

GalactiNet GT420 terminal

Back in May I was part of a team running a short LARP in our High Frontier universe.

The game plot called for the existence of a prototype communication device through which 'second contact' with an advanced extra-terrestrial species was being attempted.

In practical terms the intention was there would be a short exchange of messages between the players and these extra-terrestrials while very human chaos raged around them.

We like to do things with 'practical effects' at High Frontier and avoid whispered messages from GMs and the led me to somewhat overcomplicate the prop involved. A lot of this was because we intended to have an multi-user in-game messaging system at our previous event and I flamed out trying to deliver it in time, resulting in a big disappointment.

So this game I very much wanted to make that happen even if the actual amount of messaging would be trivial.

Every player was provided with a personal printed RFID card and inserting the card into a reader in the external unit logged them in.

The physical prop was made in two large chunks: a 'terminal' and the actual 'communicator' itself. Making these physically imposing yet still portable props was deliberate as the players would be faced with carrying them while under fire or abandoning them.

The 'terminal' is an old laptop motherboard and screen carefully fitted into a medium sized flight case with 3D printed and painted fascia. The flight case was interestingly laid out with a padded compartment on one side and I retained that for storage of a compact keyboard, mouse, cables and the power supply enabling it all to be packed down for moving.

Building this took a fair amount of iteration and improvisation. The original laptop battery pack was beyond use so I built one out of new 18650 cells with double the original capacity to ensure it would last the entire game.

Making an aged laptop bearably usable is an increasing struggle and the Raspberry Pi desktop for x86 is my go-to for this. By removing the Office software before updating you can still squeeze it onto 8GB SSDs and so long as you don't want to use Chrome with super-bloated sites performance is as zippy as it can be.

All it needed to do was run PuTTY as like my previous work on off-grid multi-user messaging this was a 'microcontroller first' design, implemented on ESP32-S2.

I took my previous, frankly unmanageable, project for messaging and created a new back end for it this time based around the port of sqlite available for ESP32. My goals were far more modest than the original project in UI terms but the back end still has most of the features to now resurrect it in what I hope is an actually manageable fashion.

Inside the communicator itself is a custom PCB I made a small batch for as long term I want to develop and use this messaging system for future games. It uses the ubiquitous MRC522 RFID reader and has a GPS attached for getting an accurate time signal, which is necessary for the system to work. There's also a uSD socket for storage (although it could use LittleFS), a sounder and some indicator LEDs.

By the time I was actually coding things for the game I realised I'd made some omissions on the PCBs but broadly they worked.

While the players interacted using a retroterm UI on the physical terminal, GMs could connect over WiFi and use a hacked together web interface to view previous messages and send new ones.

I did start by writing a fully featured web interface but the framework I used meant the ESP32 began to run out of memory once there was a non-trivial number of things in the database. Moving things into PSRAM helped, but not enough realistically.

The sqlite cache also caused me grief as it would rapidly eat all the heap memory of the ESP32, despite nominally being able to manage that itself. Tweaking compile time constants helped but in the end I found I had to aggressively clear the cache using the sqlite API after every interaction. By this point I was very close to the game, stressed about the deadline again and as messy as this solution was it worked well.

Using GPS for time, even indoors, worked well in testing but was another cause of stress on the day even though we're nominally an outdoor LARP system.

A cold GPS start, metal roof on the building used and need for it to work quickly ended up with us having to leave the communicator outside the building on a long USB lead for it to work at all.

I will not wholly rely on GPS for time again and look to fit a dedicated RTC that is set then updated by the GPS only if necessary. Even outdoors the time signal seemed unreliable but it was impossible for me to troubleshoot at the game. This meant weird slow performance and trouble logging on that I simply hadn't seen in testing.

In the end though, messages were exchanged and this massively overcomplicated setup delivered even though it gave me and the rest of the game team huge amounts of stress.

What I need to do now is work on it in the in-between times so that the back end approaches plug and play for other applications and my 'microcontroller first' plan actually means it can be used across a range of lightweight devices.

There was a whole PC doing almost nothing in this setup that could have done the messaging instead but my plan is this 'backwards' approach would allow cheap ESP32-based props to interact with the system.

You can buy something that could in principle be turned into a pocket touchscreen communicator for <£10 and I plan to pick up a couple. It's just the tip of the iceberg of what you can do with little ESP32 based gadgets. Previously I was thinking to use M5Stack/M5Paper products as well.

The messaging back end I've christened backslang and is on GitHub but I would say it is very much an unfinished mess not fit for anybody else to use. Maybe I'll find time to fix this before our next event. I'd love other people to dive in to the repo and fix my naïve mistakes but it seems unlikely anybody will have the inclination and time.

Adding MilesTag to my Arduino Lasertag library

I have for quite some time been attending LARP where Lasertag is used for the combat system. I now participate in games which have two incompatible systems, the UKLTA which uses a proprietary development (Data-over-Tag) of the early Worlds of Wonder system and Humanity Ascendant which uses commercial equipment from the Russian company LaserWar. LaserWar is compatible with the MilesTag system with a few additions for game admin.

For quite some time I've wanted to have a play with time LaserWar kit to see if I can throw some code together that works with it and I finally got round to borrowing some.

MilesTag is simpler than DoT and it didn't take long to update my Arduino library for doing Lasertag so it can both send and receive Laserwar/MilesTag hits. Sending LaserWar game admin codes would also be possible, they're just differently formatted, sometimes longer IR packets.

Sadly I can't make this open source as the packet format for UKLTA DoT is proprietary, but I might strip out the MilesTag parts separately.


LARPCon 2023 interview

 I was at LARPCon 2023 with some of my old props that make good table pieces and got interviewed by LARPBook. There's a small amount of cringe in my off the cuff talk but broadly it's OK.


Donut

Unusually, I've made a piece of costume for an upcoming game. This is the Star Wars Endor Trooper 'donut' helmet. It's not a 100% perfect piece of cosplay apparel but it works pretty well. I took a 3D printable model from Thingiverse, a surplus Austrian Army cold winter cap (which has suitable ear flaps), added a couple of big rubber washers for the earpieces with some 3D printed surrounds/caps and threw it together.

I don't often do 3D printed costume pieces (mostly because I hate sanding and painting 3D prints) but I'm really happy with how this came out.

Here, put this on.

Some time back I made some LARP props that did GPS tracking and relayed that info to players in a diegetic fashion. They were for a game set in the Supernatural setting and they were a replica of the canon 'EMF Meter' and a 'magic compass' that always pointed towards a currently possessed character.

Now I'm back on this nonsense again but this time it's for a sci-fi game at Dropzone 2023.

The Supernatural props were great at the time but they had a couple of inherent problems.

  • They used some proprietary wireless data radios that are no longer made. So while I could have made more things that work similarly with some spare items I bought from the manufacturer, it's a 'dead end'.
  • Being themed for Supernatural specifically they're not great for other games that aren't that. The compass could have been used in some other game with magic in the setting but almost all of my LARP is modern/sci-fi so it's just not happened.

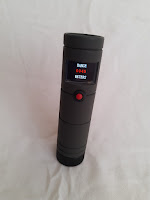
With the need to make another tracker, I opted for a canon prop replica, but one that doesn't inherently tie it to anything: the PDT locator from Aliens.

A lot of UKLTA games happen in our High Frontier game setting, which is broadly Aliens/Predator/Outland/Space Above & Beyond grungy evil corporations and monsters in space sci-fi.

Which makes an Aliens prop work nicely but the PDT locator is also very generic, it's just a dull tube that shows the distance to something on a display and beeps. So it won't stick out in any modern/sci-fi game. It could function to find a person wearing a tracker or equally be a geiger counter or locator for a stash of equipment.

Since I built the Supernatural props, LoRa has emerged as a cheap and viable long range data radio technology. It's also standards based so not likely to disappear any time soon. I've used an RFM95W module in this, which is the default cheap LoRa module used by 'makers'. It's connected over SPI and handles all the basic LoRa Tx/Rx stuff while also feeding back information about received signal strength etc. Sending data from one device to another is really quite simple but you have to be a good citizen and not transmit too frequently. LoRa comes with rules about duty cycle/spreading factor/power that you should stick to. I've tried to minimise my transmissions but haven't yet actually checked if what I've written complies.

We've also had an explosion in more powerful microcontrollers, I've used an ESP32-C3, which means I can configure the device with a little web interface over WiFi. Should I get around to writing the software using the ESP32-C3 would also allow it to detect Bluetooth tracking beacons and I've got a stash of these, so I intend to have a go at that.

I think the ESP32-C3 is becoming my go-to microcontroller even if something doesn't explicitly need WiFi connectivity. It has a great mix of features and just enough GPIO to get stuff done. With WiFi switched off it still uses more power than some microcontrollers but clocked down to 10Mhz is about the same as a traditional AVR Arduino. Then when you need to configure something you can temporarily turn up the clock, connect to WiFi and have a proper user interface from your phone or PC.

Despite the enclosure being oversize in comparison to the movie prop, mostly to accommodate the display and keep the proportions looking OK, the electronics were still going to be a tight fit.

This led me to order a custom PCB from JLCPCB that combined most of the modules together in a compact manner.

This shrunk everything down an awful lot, with the heart of it squeezing directly behind the display.

With the bulk of the space inside the tube free I easily managed to fit a decent size recovered LiPo cell from a discarded vape, a TP4056 protect/charge board and USB socket for programming.

The end result has come out pretty much exactly how I'd hoped. Minimum order quantity for the PCBs was five, so I may build a second PDT locator on principle.

The only thing I'm unhappy with is how the colour OLED display is not massively bright. In sunlight the glare on the acrylic used to prevent damage means you need to shade it to read it. So it's better for night games, but that's fine as it's getting a first run out in a night game.

I used a colour OLED instead of a fixed 7-segment LED display from the original prop specifically to make it more flexible long term. I plan to find some larger, 'digital clock' style fonts to make it look more like the original. The currents fonts and UI are just a bit of a placeholder to allow me to test with.

So far I've tested it out to 150m from a beacon and it's fine, which is all the range I need for it. With LoRa, even with the slightly compromised wire antenna inside the case I'm expecting it to hit 200m+.


The user interface only needs to be very basic for end users, as I've written a little web configuration page to set it up more fully for games. The step up from traditional Arduino AVR dev boards in these projects to ESP32 boards really opens up so many capabilities while not increasing the cost.


For now I'm testing using beacons assembled on breadboards, but I will probably assemble the other tracker PCBs I ordered to function as beacons in our game next month. This doesn't preclude later turning them into more trackers by soldering on a display.

Finally getting off the pot

I have been meaning to make myself my own Lasertag weapon electronics for a long time.

All our Lasertag LARP weapons are 'homebrew' and mostly rely on a small number of people doing cottage industry builds of PCBs for them but I've previously made things of my own with Arduino Nanos and stripboard.

The barrier to committing to a 'proper' design of my own has been an inability to settle on a good solution for generating the sound. Generating the Lasertag signal is well understood but we've previously relied on bought in boards that play back uploaded samples, which have been of variable quality and sometimes a bit too quiet for my liking.

With the knowledge that the ESP32-C3 can use I2S to play back sound I've had it in my head that it should be possible to make a Lasertag board based around one. This is especially so as the ESP32-C3 also has the 'RMT' peripheral designed for IR remote control which generates signals similar to our Lasertag system in hardware.

After a bit of prototyping at my desk I got the infrared data transmission, screen and sound working so I've committed a design to EasyEDA and ordered some boards from JLCPCB.

They're very much MVP boards, with an LDO for voltage regulator (not massively efficient) and the onboard lithium cell charger being a bought in TP4056 module. This will let me test the design at our next event in May, hopefully.

The desktop testing seems to work OK but real life testing will show up how well it works with other sensors and long ranges. I may have underspecified the MOSFETs and passives, but I'll find out.


Obscure Arduino tips #4

I've started using the ESP32-C3 a lot recently because it's a good replacement for the ESP8266 with slightly more usable GPIO pins, no onerous pin strapping issues and native USB for flashing and debug output. It ticks all my boxes for a general purpose microcontroller and one day I might even use the Bluetooth capability.

One thing that is a minor irritation is the number and naming of the hardware Serial ports changes depending on whether you enable 'USB CDC on boot' and this isn't immediately obvious how to deal with.

With USB CDC on boot enabled you have...

  • Serial - USB CDC
  • Serial0 - hardware serial UART0
  • Serial1 - hardware serial UART1
Without it enabled you have...
  • Serial - hardware serial UART0
  • Serial1 - hardware serial UART1
  • USBSerial - USB CDC
The 'other' Serial ports don't exist other than when you choose the relevant compile option so you'll get compilation fails when swapping from enabled to disabled for the USB CDC.

Which means writing code that works in both situations needs some mediation. I had a poke around and found the relevant pre-processor directive that helps smooth this over.

Add some code like below and it handles the problem.

#if ARDUINO_USB_CDC_ON_BOOT == 1
    #define SERIAL_DEBUG_PORT Serial
#else
    #define SERIAL_DEBUG_PORT USBSerial
#endif

You can then just use

SERIAL_DEBUG_PORT.println("Hello World");


Reject modernity, embrace tradition

I've recently been ordering some custom PCBs from JLCPCB for projects. The combo of EasyEDA and direct integration with JLCPCB, who offer it, makes it easy for somebody who's used to homebrewing small bits of simple electronics to spin up PCBs. It's cheap too.

They've all been variants on an ESP32 microcontroller, some kind of 3.3v power supply then a load of headers for the specific peripherals I want for that specific project.

My SMD soldering is a bit hit and miss, I've had a few irritating failures from creating shorts under big modules like the ESP32-WROOM or the uSD socket. I'm OK at putting solder paste on, but then I tend to very slightly botch the placement and have to nudge the module into place smearing it. I just don't have hands steady enough to get it right first time. I'm fine with the smaller components.

On the whole though it's a positive experience and I've got better at this than when I was first ordering things in 2019.

One of the things that changed since then is the proliferation of microcontrollers that have native USB support. Now there are multiple ESP32 variants with it but it's appearing all over the place, right down to the ultra-cheap RISC-V chips from WCH.

The boards above have ESP32-S2 modules but I'm also making things with the ESP32-C3, which I'm coming to really like due to low cost, native USB for programming and just enough GPIO for most things.

The upshot of this is making boards with USB naturally leads to wanting USB connectors for the boards. 

Which I dislike.

Low volume electronics projects with SMD soldered micro-USB sockets have a bad history for me. I've damaged or totally ripped off the socket on more than one board and they're often just a bit cruddy. Professionally made high volume products are better but it's still a weak point.

The obvious solution is to fit USB-C, which addresses many of the issues but have you looked at the soldering footprint for one? Nope. Also I don't need USB-C. These are USB 1.1 devices with no need for Power Delivery or anything smart.

So I've embraced old-school full size USB-B connectors for the larger PCBs. They're trivial to hand solder and robust. Which is good if they're likely to get rough handling, which some of these may do. If it's going in a physically large object the extra size isn't going to matter.

For the smaller PCBs I'm using some common cheap micro-USB breakouts. External USB-C breakouts would also work.

The ESP32-C3 is replacing the ESP8266 in my affections and I ordered twenty of this PCB. It is effectively a small battery efficient development board. So I've reinvented the wheel a bit.

In the kind of projects where I expect to use this I often bury the main PCB inside somewhere but will want the USB socket accessible in the side of the enclosure.

Having the USB socket on a short flying lead is convenient for this and USB is more tolerant of this than you'd expect. In principle you need to match the track impedances/lengths etc. but in practice you get way with it. It adds a lot of flexibility and if the socket gets damaged it can be easily replaced.

Separating the the USB socket also means I can come up with whatever power path I want at time of build. Some things are going to have LiPo batteries and want an onboard charger. Some will have removable batteries. Some will be USB powered. These boards are generic after all.

I may come back to this and design myself a board that includes onboard power path management/charging for a single LiPo cell, which I did on an old design, but for now I'm happy with how these are coming out.

A library full of boilerplate maybe becomes useful?

A while back I wrote an Arduino library to do the tedious bit you add to every bit of code you write for an ESP8266/ESP32 where it tries to connect to the WiFi and waits for it to happen, or not.

This is the most basic stuff and it's in almost every thing I make, frankly almost everything anybody ever makes with an ESP and Arduino. Yet you end up rehashing it and typing it or copy & pasting it. Again and again and again.

So I put it in a library.

It feels like an act of fraud. It's not a fancy connection manager with credential storage. It just tries to connect and feeds back the result. It can optionally stick out a load of diagnostic stuff on the Serial port, which is nice but it still felt like overkill.

Now, inspired by something of Larry Bank's I've made it do geolocation of the device through the https://ipapi.co/ API and it handles the setting of timezone and the system time using NTP.

That is useful as a one-line addition to any network connected project.

A lot of the time people don't bother with their devices 'knowing' the time themselves but I'm a big fan of it and I often use it somehow in my projects.

Useful Sensors Person Sensor testing

One of the things I'd quite like to do with my Rover project is have it detect when a person is in front of it and aim a camera at them. The long term goal is that it's a kind of telepresence device, but this is also another way to avoid collision with people and I want as many checks on that as possible.

When these very cheap sensors from Useful Sensors appeared I grabbed a couple.

Their USP is supposed to be that they offload all the machine learning face detection onto a dedicated module you can just get readings from and will even learn specific faces. In practice I found they seemed to be very prone to false positives so I left them sitting unused for a month or two after an initial burst of enthusiasm.

At LARPCon I had a chat with a droid builder who'd brought one of their in-progress projects along which is part-finished B2EMO replica. 

This droid has a prominent 'eye' camera, although in practice it's just a drone camera much like I've been experimenting with.

This made me think of the Person Sensor again and have another go with it. For testing I attached it to the cheap pan/tilt setup I have the drone camera in and started trying to filter out the false positives from the Person Sensor.

It became clear pretty quickly that the false positives are very 'bursty', ie. you'll get 2-3 false detections in a row then they disappear. With detection happening at around 5Hz, ignoring any detections with less than four consecutive positives seems to pretty much kill them all without adding much latency.

I then set about making it track the 'best' face and move the pan/tilt setup. After a bit of faffing with preventing constant hunting due to lag I eventually got decent enough tracking so long as the lighting is favourable.

Yes you could do this with a powerful SBC like a Jetson Nano and do it better, but this is doing it with a standalone $10 module and offloading the work. I made a little video of it tracking in my cellar. Beware the static on the audio channel, this video is coming from a USB 5.8GHz receiver and the camera has no microphone.

I think this works passably OK now so I'll be investigating this further and seeing about making a more stable pan/tilt mechanism. I may also wrap the Person Sensor functions up into an Arduino Library for the benefit of others. It's not complicated to use but abstracting stuff into a re-usable library is better.


LARPCon 2023

This weekend I helped crew the UKLTA stand at LARPCon 2023, which as the name suggests is a convention dedicated to LARP.

In the UK we don't really have a 100% definitive 'must do' LARP convention but LARPCon is the closest we have.

A lot of it is dedicated to traders and there's a heavy 'fantasy and foam weapons' slant from both the attendees and the stands. So it made our representation of sci-fi/modern/light mil-sim games using Lasertag weapons something unusual.

Overall though it was a very positive thing to do. I ended up spending a chunk of time talking to people with similar interests and had taken a few of my interactive props along. This was a bit of a last minute decision but I'm glad I did.

Old things like ORAC and my Enigma machine were cooed over, they make great 'showboat' props because they fill a small table and are immediately recognisable. So they did the job of helping get people over to talk to us.

I ran into a bunch of people interested in making interactive props who asked for my contact details and I'm hoping they get in touch after the event.