Quick cyberdeck build: Part 7

I've been worrying about the charging of the battery for the Cyberdeck and my naïve idea was to simply stick a TP4056 charger inline with the battery. This sort of worked and when I fitted the new battery recently I checked it was OK, but the behaviour of the phone and the labelling on the pack gave me pause.

For a start the phone doesn't know the battery is charging. This sort of doesn't matter but you've also got the issue the charger doesn't know when to stop charging if the phone is switched on, due to the load from the device. This is exactly the sort of stuff I get fussy about in other projects and it's nagging at me that I was not practicing what I preach.

Also the TP4056 is set up for a slightly different chemistry cell with a 4.2v charge voltage. The battery I received has a 4.35v charge voltage and a peer at the images for these Motorola replacements shows they're all the same.

You can't change the charge voltage on the TP4056 it's preset.

This put the nail in the idea of just sticking that TP4056 charger inline and I'm back to charging it via the phone. Which is precluded by the OTG USB needed for the keyboard and trackball.

So I need to make it switchable.

For USB OTG to occur, the usually unused ID pin on the micro USB connector needs to be connected to ground. When this happens it turns the phone into a USB host and it starts supplying 5v on the VBUS pin normally used to charge the phone.

Once in USB OTG mode you can't charge the phone and supplying 5V on VBUS doesn't achieve anything. If you switch out of USB OTG mode while supplying 5V on VBUS with a device still attached this particular phone cycles from charging to not, which I'm not sure is expected behaviour or not but it's what I've got to deal with.

I've done a practical test to verify all this and using a couple of switches means you can swap from charging to USB OTG reliably. I'm sure something could be done with a few MOSFETs to effect the required swaps when you connect a charger but for this project I'm just going with a DPDT switch made out of two small SPDT switches mostly for time reasons. This has the added benefit of allowing me to completely disconnect the USB peripheral if I want.

So I've got to remake the little flat USB OTG cable I made and rework the whole thing, but I think it's worth doing slightly more properly than I'd planned.


Hoverboard motor powered rover: Part 3


I finally took my rover down to East Essex Hackspace and drove it around a bit.

This showed it to be fairly easy to drive with the ESP-Now Nunchuck remote control and the range is more than I need for basic testing.

At its lowest speed setting the rover doesn't always make a lot of purchase on the uneven ground as it's prone to wheel spinning, but as it's 4WD it always makes some progress. This will be massively helped with some form of suspension.

Four wheels screwed to the corners of a piece of plywood is not an optimum chassis design once the surface is anything less than super smooth, but I knew this when I did it.

On the higher speed settings it digs in, gains momentum and flies about, rattling as it goes. The Kinect shook off of its 3D printed mount and I could hear the cable-tied Raspberry Pi rattling like mad so these things need securing in a significantly better way. I'm building up to stripping down the Kinect and making a custom enclosure of my own.

For the test I was using the 'best' of the three battery packs salvaged from the hoverboards and it lasted just fine.

There's not much else to say about this test but here's a little video I recorded.


Quick cyberdeck build: Part 6

Today I received the replacement battery for the cyberdeck and fitted it after modifying the leads so I can insert the external charger between battery and phone. I'm still not 100% happy with this setup but it works.

The interim result is really quite appealing but the paint is still not 100% dry and as I need to handle it a lot doing the last parts I'm going to shelve any more work on it for a couple of days. It's gloss paint so still very slightly soft and I bet it actually takes a week to dry.

Designing the bumpers has got a little mired in lack of vision for what they should look like and some difficulties there'd be in printing and painting the sort of ribbed look I originally wanted. The OpenSCAD design has got very messy with little tweaks to locations and dimensions all over the place in the code so making anything line up nicely is hard. I need to resolve this soon as it will be a long print that also needs painting.

Quick cyberdeck build: Part 5

Quick? I don't think so.

With no immediate use for my Android Cyberdeck project it got shelved for almost a year but now I'm off to a LARP next month that is using the Discord app. for in-game communications.

So this came back out of storage and progressed somewhat.

To make the XBox 360 chatpad and the little Pimoroni trackball work I've made a custom short flat USB OTG cable by cutting up one of the OTG adaptors I had (so it had the extra pin shorted) and mating it with a micro-USB plug scavenged from a cable. Yes you can buy these things but I'm not in the habit of making my own USB cables so I don't have the parts hanging around.

There's a small nub sticking out of the side of the current enclosure but it's getting cosmetic 'bumpers' I'll use to hide this.

The redesign for more buttons has gone OK. There are now three illuminated tactile buttons which I'm hoping I can make use of for dedicated forward/back as well as the usual click. I could almost do with some more because Android has a surprisingly pleasant mouse button interface that you don't normally experience because frankly how often do you connect a mouse to your phone? I might try and implement some buttons in the side that take the place of a mouse scroll wheel, but it'll be fiddly to physically mount them.

The huge battery in shot is just for testing it's far too big to work in the final thing, I think I'm going to order a replacement for the OEM battery as it's a perfect fit. Tucking the added electronics into that space was the original plan but a nicely fitted battery is more important.


Hoverboard motor powered rover: Part 2

One of the features I really want to play with in the rover is some kind of location awareness combined with obstacle avoidance.

There are a lot of ways to do this of varying effectiveness based on the situation.

In one of my many boxes of maker junk I had an XBox 360 Kinect, which like the hoverboard was a thing lots of people threw time at hacking several years ago.

The 360 Kinect is old hat now and more modern sensors do more but I've got the Kinect. More importantly if I want to do things like cut the cable down, remove the case to slim it down etc. etc. they can be had for less than the cost of postage on eBay. So I've bought second one and it's on its way.

The Kinect is a combination of a decent conventional RGB camera, infrared camera and an infrared projector that throws a mass of points of infrared light at the scene. Onboard processors then turn that into an RGBD (red/green/blue/depth) image by mapping the distortion of the infrared dots.

The problem with old open source software is much like old closed source hardware: it stops working.

Not in the fact it's fundamentally broken but the shifting sands of time and internet entropy means once it's no longer heavily maintained and interested people move on links break, software versions change and stuff gets deprecated.

You can still install it from binaries. The SBC I actually wanted to try the Kinect with installed them just fine but then it failed to work with no obvious error.

Moving on to a laptop running a different Linux variant the binaries installed and worked but without sound. The Kinect firmware is missing from the binaries. The firmware is a Microsoft blob of proprietary stuff so that's understandable but the script to download that firmware is missing too. I don't have an immediate need for the onboard microphones but it irks me.

So I shifted to building from source and the instructions are wrong.

Not hideously wrong but links to libraries and git repositories were wrong or out of date and some default installed utilities needed are no longer there. So I muddled through and got it built. If I have a second go at building it, which is inevitable, I'll try to write it up and correct the OpenKinect Wiki.

My being able to correct these problems is one of the strengths of open source software but I fully understand why a lot of people find it frustrating. When I first got the Kinect out of the box it's been lurking in for several years to prove it still worked I installed the Microsoft drivers and developers kit on Windows 10. The Kinect immediately gave results ten years afters release. It 'just worked' in the way everybody moans Windows doesn't.

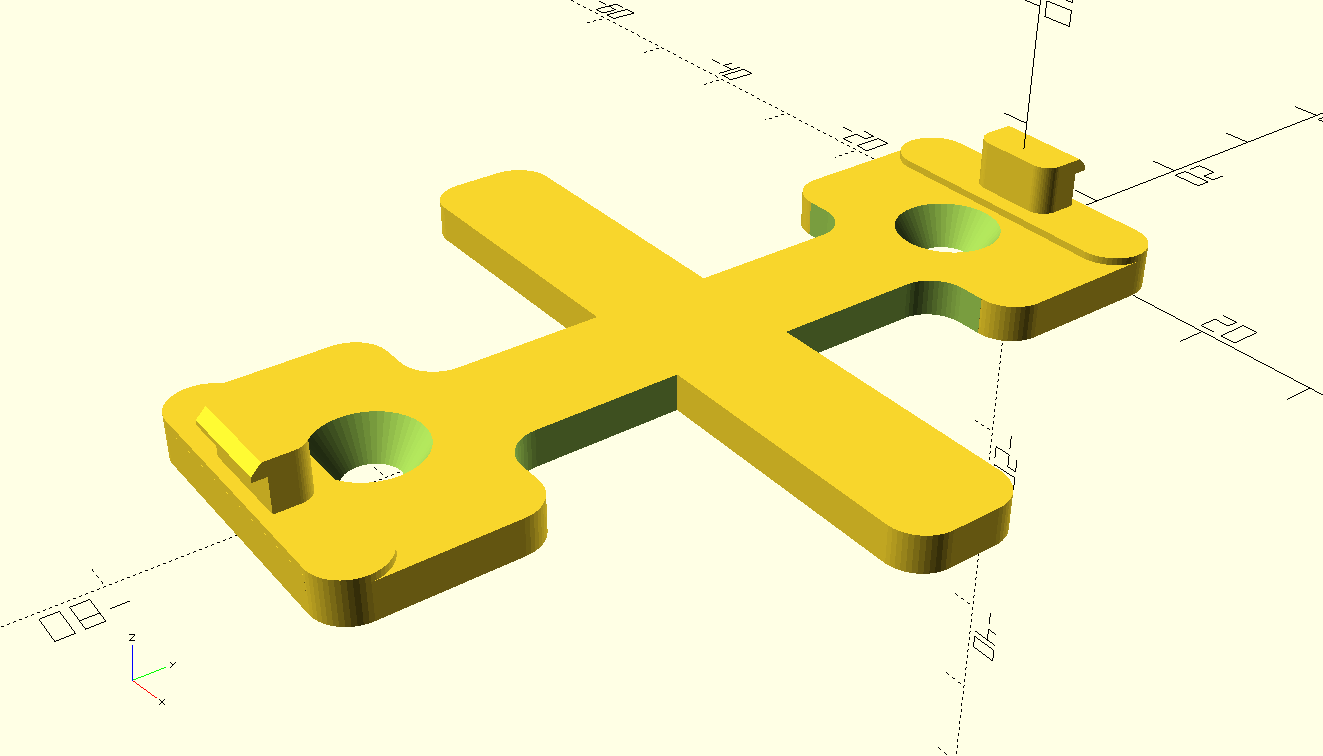
In parallel with this I've been wondering how to mount the Kinect so as per usual it's 3D printing to the rescue.

I didn't like the look of any of the mounts found on Thingiverse (one of them I tried just didn't fit) so I designed my own. Making very specific module/object mounts for prototyping things seems to be a thing I spend a lot of time doing. The end result is quite nice so I've uploaded it for other people to use.

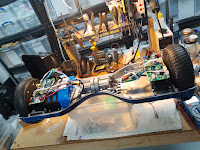
I've now made a 'deck' on top of the rover that protects and hides the messy motor, driver, battery and power supply wiring. The battery puts out 31-40v but I need 5v and 12v (maybe 3.3v too) buses to drive the control stuff and this wiring begins to take up a chunk of space. There's also on/off switches, battery isolator, charger connections and so on. Deck is a fancy word it's just another bit of plywood  from a skip with stuff screwed to it haphazardly.

First on the list screwed to the deck was the Kinect on its 3D printed mount.

The thing with the Kinect and frankly any other kind of RGBD sensor is they are quite 'heavyweight' sensors in terms of processing power. You get depth information but it's not an easily digestible map; it has to be processed extensively to act on.

This is on top of all the limitations the sensor has physically. It just can't be relied on to reliably prevent collisions etc., even before you allow for any mistakes in my coding and setup.

If you look at almost any autonomous vehicle they will have a whole suite of sensors to keep things safe and to that end I've made an array of three old-school ultrasonic range finders on the bottom of the rover in another 3D printed enclosure. They fit quite nicely between the two motor mounts.

These ultrasonic sensors are decades old tech but you still find them in beginner robotics projects because they're cheap and highly effective at short range. They too have limitations, but should be an OK backstop for making it harder to drive the rover straight into a wall or perhaps more importantly into somebody.

Running these ultrasonic sensors is an old-school Arduino Nano, which frankly is perfect for this task. I may buy another three ultrasonic units and stick an identical array at the rear. The rover essentially has no front other than what I've chosen by sticking the Kinect at one end. It can move and turn the same in either direction. Given how cheap Kinects are I may investigate if it's possible to connect two to one computer but I suspect the answer might be no.

Reading around the topic I've found basic microcontrollers like older Arduinos can be used to feed information into Robot OS (ROS) over USB serial quite easily. So connecting up a bunch of basic sensors pre-processing their outputs and generating something easy for ROS to digest is where I'll concentrate before getting into any complicated mapping.

Hoverboard motor powered rover: Part 1

For absolutely ages I've fancied building a remote controlled rover that's got some physical heft and can handle rough ground. I've never really been into RC cars but a 'robot' is different.

This urge goes all the way back to the 90s when I was a fan of the TV show Robot Wars and at one point I got as far buying some big AGM batteries and wheelchair motors but like with a lot of projects my enthusiasm fizzled out. Part of this was because back when I was first looking at it this was an expensive hobby. Good quality speed controllers, good RC gear and access to the materials and machine tools needed to build something (unless you worked for an engineering company or University Engineering dept.) implied a level of investment in time and money I couldn't really do. I eventually became friends with some people who had competed in Robot Wars but I never built a 'robot' myself.

Now we live in quite a different world.

Electric vehicles of all sizes are now commonplace; from RC quadcopters to commuter scooters, electrically assisted bicycles, motorcycles and cars. Developments in battery technology, brushless motors and semiconductors haven't only been technical improvements but also the cost/performance improvements that come from massive scale manufacturing.

Also, all manner of hobby electronics and computing has become hugely more affordable and accessible. I'm an active member of a Hackspace with access to all the tools I could reasonably need to make something viable and I've a bunch more free time than I used to have, at least for now.

My recent trip to EMFCamp 2022 got me enthused again and while there I bought a 36v eBike 'Silvertail' battery pack as it's a well packaged large chunk of power with a built in battery management system. I've also dived in and bought some broken 'hoverboards' to play with.

The craze for hoverboards a few years back created a glut of cheap second hand ones, often 'dead' due to poor battery management making them refuse to charge. The same poor battery management also lead to a number of dangerous house fires, a reputation that still persists despite battery safety getting better.

Naturally, Hackspace people got hold of these and tried to do things with them.

The motors are very high performance for the bargain bucket second hand price and come with everything you need to drive them, maybe even battery packs if you can replace any dead cells without setting fire to anything. Good speed controllers are still expensive but the ones in hoverboards are kind of adequate.

Lucy Rausch worked out how to replace the original firmware for the ubiquitous controllers in early hoverboards and a whole load of people built comedy vehicles with them. A bunch of Germans are very into converting the popular children's ride-on "Bobby Car" toys into absurdly nippy little vehicles.

I've bought two of these 'dead' hoverbaords and even had a go at reviving the battery packs.

What could possibly go wrong?

There isn't a huge plan here. I just want to enjoy exploring how this works and as I'm coming at it after everybody else has already had a go there's plenty of information out there.

My minimum viable rover is just four hoverboard wheels, controllers and recovered battery pack screwed to a piece of plywood. This is not its final form, which may be six wheeled with rocker/bogie suspension in a vague Mars Rover homage.

The whole project has a bit of a 'what people were playing with 5-10 years ago' thing going on. It's not unexpected as where possible I'm using stuff I already have kicking around in the cellar.

Lacking any RC gear I made my own 2.4Ghz remote using a Wii Nunchuck controller which were ubiquitous in Arduino projects a while back and a couple of ESP8266 microcontrollers sending ESP-Now packets.

I ended up reasonably happy with the resulting code and might publish it even though it overlaps a bit with other published projects.

I'm also minded to play with a bit of collision avoidance and/or location mapping. Not to make the rover autonomous but to make it 'hard to crash into stuff'. This can advance separately from the chassis and basic remote control use. What was everybody enthusing about ten years ago that I had in a crate of junk?

The Microsoft Xbox 360 Kinect.

It's old hat, doesn't work outdoors in direct sunlight and getting old enough that support in modern versions of Robot OS might have disappeared enough that I give up on the idea, but I do have one and it does work as I've tested it with a fresh compile of the open source libraries.

I know in my heart I'll have to buy a proper LIDAR sensor (which like almost everything else have become massively more affordable) but in the meantime I can tinker with this.

So how far have I got?

Not massively far but I do at least have one pair of wheels moving.

Since the original explosion of hoverboard hacking the controller hardware has changed and you can't use Lucy's firmware, but various people have adapted it to the controllers they've found in their hoverboards or even started again from scratch.

One of my scrap hoverboards had controllers supported by one of these firmware variants, the other didn't.

A bit of peering at markings on the microcontroller suggests I could probably reverse engineer the board rework the pinouts and make my own firmware variant but that's going to be time consuming. So I've ordered another pair of identical boards to the supported ones. This was about the same price as another dead hoverboard but you won't know which controllers are inside until you open them.

It does live though...