Doing a rebuild, and how to start from scratch

The small SATA SSD I used to build my BC-250 got quite full quite quickly and I wanted to get a bigger one, but the price is quite scary nowadays.

Browsing second hand items in the local CEX I saw a 1TB "M.2 SATA SSD" lurking at the back of the display for a decent price. I figured SATA is slower than NVME but almost certainly good enough given the BC-250 only does Gen2 speeds. When I paid they handed me this, which is actually a 1TB NVME Gen4 SSD, so I got a real bargain.

Also this meant it was time for a rebuild and I decided to write down the various tweaks to Bazzite I did in the process. This is all information from other people but is scattered around various GitHub pages and Discord so I'm going to try and link to everything useful here. I'll update it if I find other things.


BIOS Flashing

The default BIOS is not what you want for a gaming system, there are a couple of 'unlocked' images available and I would recommend with using v3.00, using this method. Beware lots of the pages are AI generated so it has some duff information in like the pinouts for the power connector, which caught me out, but this section is OK.


Installing Bazzite

Modern versions of Bazzite will just boot and install, only needing some minor tweaks afterwards. Download an image for a USB stick and flash that stick (16GB+) with Balena Etcher. When you do the download, select the following options.

  • Desktop
  • AMD (R4xx+ | AI)
  • KDE
The final option is whether you want to boot straight into Steam gaming mode and that is probably a good choice if that's the main use for the machine.

Enabling SSH

Many of these later tweaks are done in the terminal and it's very helpful to enable remote access over SSH, so go in to desktop mode from the power menu and open a terminal. Pop in the following...

sudo systemctl enable --now sshd

...you will now be able to log in remotely and do the rest of these setup steps.

NexGen-3D-Printing setup script

One of the very involved people on the Discord has come up with a script to do a set of optimisations and fixes that suit the BC-250 better than the Bazzite defaults. This is around swap size, zram and so on.

There are instructions for doing the all-but-essential GPU overclock in the document and you should work through them to set a level that works for you.

Cooler Control

You will almost certainly want to have some monitoring of temperatures and fans. There's a good section in this page on the subject. Essentially you need to install Cooler control from the terminal...
ujust install-coolercontrol
Beware lots of the pages are AI generated so it has some duff information in like the pinouts for the power connector, which caught me out, but this section is OK.

The first time you run Cooler Control it will tell you the commands you need to type in the terminal to enable its service.

Cooler Control can customize your fan speeds for different temperatures in a more flexible way than the basic BIOS settings, so set your fan to 100% in the BIOS then use Cooler Control to lower it from that. You generally want the "Pump fan" to be running 100% if the GPU gets to 70C but below that you can fiddle with the curve to be cooler or quieter.

ACPI

Bazzite by default doesn't handle the BC-250 ACPI states, again NexGen-3D-Printing has some instructions for fixing this. Even with this idle power efficiency is pretty poor and sleep doesn't really work.

CPU overclock

The main NexGen-3D-Printing script takes you through GPU overclocking but not CPU overclocking. Which is frankly less important but the instructions for this are in the same document as the ACPI info.

Heroic Launcher

If you have games in stores other than Steam, perhaps a library of free games from the Epic Games Store, then you can install these using the Heroic Launcher. Switch to Desktop Mode from the Power menu and it's in the "Bazaar" which is Bazzite's app store.

Look through the settings before you install any games, in there is a tickbox to "add to Steam" and this will make these other games appear in the Steam Launcher once you've added them using Heroic Launcher.

The very roundabout on/off switch mechanism

With a little circuit tested that latches on when the BC-250 starts and puts the server PSU into standby when it shuts down I still wanted to make the behaviour more "ATX-like" ie. you can also use the power button to ask the system to shut down.

There is a button on the faceplate of the BC-250 that can act as a shutdown or sleep switch depending on how you configure it in the OS. Sadly this isn't brought out on a header anywhere. Which means soldering directly to the PCB. I checked the BC-250 Discord and made up a little flying lead for this.

Some of the people on the Discord have been making quite complicated latching setups for doing this, some including microcontrollers, but I've opted for simple expedient use of a DPDT momentary button.

One side of the button is connected to my latching setup that turns the BC-250 on. The other side is connected to this flying lead on the BC-250 that asks it to shut down.

That's it.

Push for on, push for off.

This will also allow me to go with the decorative button switch I fancy for my case and I've designed a 3D printed mechanism that holds a brass coin and the actual switch. If I laser-engrave the coin and sink this flush in the front of the case it should look pretty snazzy.


Cardboard engineering

With no ATX compatible power switch and standby mechanism the BC-250 expects there to be a constant 12V at the GPU connector. This is slightly wasteful as the PSU is always on. There's a 'power switch' on the BC-250 you can use to turn it off and on, but it doesn't communicate with the power supply at all.

I quickly bashed together a little MOSFET based setup that puts the server PSU I have in standby. When the BC-250 is on it uses a feed from one of the headers to hold the PSU on but when it shuts down the PSU goes back into standby.

While I plan to make a wooden case I'm probably not going to be CNCing a back panel, it's out of sight so 3D printing will do. I improved on my original brackets and printed them on the Hackspace printer which produces better quality prints than mine do.

These brackets are designed to just screw to a wooden baseplate and hold everything firmly. The baseplate is going to be a bit of boring old plywood and then I intend to lower something more decorative over the top. Most of the gamers doing BC-250 builds are going for gamer type stuff and I quite fancy a 'steampunk steam deck' made of wood with brass accents.

The Hackspace got a fibre laser engraver recently so doing little embedded brass plaques etc. should be very possible but will mean learning to use our CNC machine. My woodworking skills simply aren't up to the chisel work to do it by hand.

Before I get ahead of myself though I need to make sure this arrangement isn't going to cook the BC-250. So it was time for some cardboard engineering and a heat soak test.

Nerdsniped into building a gaming rig

I haven't gamed since the Half-Life 2 era but every now and again I get the urge to play a computer game. This is frustrated by not having a computer with a meaningful GPU, which almost everything needs. 

Even before the recent LLM driven inflation I just couldn't justify the quite expensive exercise that building a gaming PC had become. Nonetheless I "banked" lots of games made free on the Epic Games Store thinking I might one day play them.

I think that time has come. This is because a friend at the Hackspace bought a BC-250.

Designed to work as a crypto miner with multiple boards in a large server chassis it's a single board computer built around a variant/cut-down version of the AMD APU in the Sony PS5. When the bottom fell out of the market for these because mining moved on then they ended up on AliExpress at a huge markdown. At one point they were available for a pittance, maybe £50 but as of now you can get them for £120-130 if you pick your moment. The 'sales' are frequent and the price spikes up and down.

What you get for this is...

  • CPU: 6x AMD Zen 2 cores @ ~3.5GHz
  • GPU: 24 RDNA2 Compute Units (1536 shaders)
  • Memory: 16GB GDDR6 shared memory
  • TDP: 220W (50W idle - 235W max load)
  • OS Support: Linux only (no Windows GPU drivers)
Nothing stellar but when a gaming PC or laptop can easily be £1.5k this is very tempting. You won't be playing brand new AAAA games in 4K, but you can play recent games for example Cyberpunk 2077 in 1080p.

The other thing that's moved the needle is the arrival of gaming on Linux as a thing people just do. Driven by Valve's work on the Steam Deck many many modern games just work, sometimes better than they do under Windows.

There are several Linux distros taking advantage of this Linux gaming surge, notably Bazzite which pretty much turns any generic machine into a Steam Deck. Bazzite supports the BC-250 well. With the addition of "Heroic game launcher" you can play Epic Games Store items as well as things from Steam. So that library of free games I've wanted to play is back on the table.

There are some inconveniences.

Obviously you've got to add an SSD but I was lucky enough to have a small one kicking around.

Also you need a PSU. An ATX one will do but you don't need most of the connectors. I've bought a small server PSU and plan to make a custom power lead although most people use small Flex-ATX ones. I had an old ATX PSU that will power it but it's too bulky for a tidy case build.

Most tiresome is the need to 'peel' the heatsink so you can fit a conventional cooling fan to replace the high pressure airflow that would have been in the server chassis. That's a fiddly job I spent an afternoon doing.

As it's very much a unique form factor you can't just buy a case, but there's a whole community of people designing cases mostly 3D printed. I intend to make a wooden case from scratch.

So far I've got Bazzite on, set it up on a table in a spaghetti wired fashion and proved to myself I can play some games.

More on this when I get to building the case. I suspect the first game I'll play is Half-Life 2 as it's a 'comfort blanket' and a true landmark in design. I need to ease back in slowly.

Why is this related to my various prop building shenanigans? It's not really, but also the BC-250 runs off just 12V not the full set of ATX PSU voltages. Which might make running a moderately powerful Linux machine with a GPU in a field off a lead acid battery a thing. I've not used an LLM as an interactive NPC-like object in a LARP but it has been done and this might get me the hardware to do it without relying on cloud services.

There's a lot of negativity about LLMs in LARP, especially around the replacement of artists and writers and I'd never do that but a set of offscreen low-importance NPCs in our sci-fi LARPs that people can interact with would be interesting. We implemented MU|TH|UR with a Telegram chat but keeping up with it kept one of the GMs very busy.

MU|TH|UR v1.5 - PTT and two Telegram bots

Back when we ran High Frontier: The Drake Objective in 2024 I used a Raspberry Pi to turn Telegram messages into the "sad computer voice" prevalent in sci-fi movies.

This was a surprise hit in the game but there were a few problems...

  • One of our players is very hard of hearing - so unable to engage with much pure audio content
  • It's really easy to miss random out of the blue messages from a walkie-talkie unless you're actively engaging with it in the moment. Doubly so if somebody is talking to you in person at the time. We were asked to repeat messages all the time.
  • It used voice activation on the walkie-talkie doing the transmitting which wasn't totally reliable and it would occasionally clip the start of messages despite making a "beep" before talking
All of these were related to me just bashing it together in the fortnight before the event while also working on other stuff.

For High Frontier: The Weyland Factor we wanted to fix these and perhaps also have it transcribing incoming messages from the walkie-talkies for MU|TH|UR v2.0.

I started on the update then quickly decided to drop the transcription and constrain the project to just fixing the acknowledged problems before doing something that could suck a load of time and effort. 

The frequency range of audio transmitted by PMR walkie-talkies is limited and it can be hard for a person paying attention to distinguish speech sometimes so I surmised automated transcription would do more poorly, even the cloud based 'AI' version of it.

My original version had a single Telegram bot that was part of a group chat with a simple command interface. The event GMs could chat in the group normally but anything prefixed with the command "/say" would be turned into speech and sent to the PMR. The bot was just one of Telegram's example bots and Microsoft's Azure speech to text example smushed together, but it worked well. With no WiFi on-site I relied on a 4G dongle I had kicking around that "just worked" in the Raspberry Pi.

Everything looks like a nail

As Telegram worked well for the GM group and I had a load of Android tablets with LTE modems from other events, the obvious way to give the players a text channel to interact with MU|TH|UR through was just another group chat in Telegram.

While I had physical carry cases for the tablets the interface couldn't be skinned to be "diegetic" with the time I had. They just had some Android Tablets and Telegram but this is not an immersion destroying thing and to do anything else would have been a big pile of work. A custom Android app or Progressive Web App is something that's in my wish list for the future but wasn't realistic for this event.

So with two chat groups that created a requirement for two bots if I wanted to "separate control messages from user messages" which is a good design pattern even though this isn't exactly a highly sensitive application.

Two bots, one script

All the main Telegram bot Python examples are for one bot, which is fair enough. I am not a Python programmer and quickly found that the 'blocking but async event driven' default way of writing bots with the common library is inimical to running two bots at once. Well not exactly but you then can't use the 'convenience' methods and have to engage with the Telegram API at a lower level. Several people have asked for a multiple bot example but the library maintainer's response was of the vaguely dismissive "read the docs/now draw the rest of the owl" variety. Likewise lots of other responses kicking around on a search have pseudocode partial examples that just didn't run even when I tried to fill in the blanks.

So, sledgehammer to crack a nut time and I quickly taught myself how to use the multiprocessing library in Python. Wasteful but it's only a Telegram bot talking to webhooks on a system with one job to do. The two bots talk to each other via a multiprocessor Queue: player messages are passed to the GM bot and GM messages intended for distribution are passed to the player bot. Not unexpectedly there seems to be a lot of subtlety about whether certain things are thread safe in Python when using the async.io method the Telegram library uses itself. I think using the multiprocessing library and its own inter-process communication method insulates me from that but like I say I'm no Python programmer, my usual playground is C++ and FreeRTOS.

While I was doing this I added a tiny bit more subtlety to the control. Messages prefixed "/say" would go to the player group chat as well as being broadcast as speech. Messages prefixed "/send" would just go to the group chat. This was a speculative feature but ended up being useful.

Push to talk

There's no standard for connecting things to PMR walkie talkies but they do share a kind of common pattern. I used the same circuit as I did for MU|TH|UR v1 to match impedance/levels and added in a relay that grounds the 'tip' connection when you want to transmit.

From this it was simply a case of triggering a GPIO pin before 'speaking' to latch the relay and then release it afterwards.

The end result meant triggering the PMR was now much more reliable and receiving PMRs received the messages more consistently.

When 3G is no longer enough

With not long to go I had it all working and plugged in the dongle to do a bit of a final test. Which then stubbornly refused to work. I spent far too long trying to troubleshoot this, cursing bitrot and version creep in Raspbian but when it occurred to me to try the dongle in my laptop it didn't work there either.

Despite being listed as "4G" in some specs that show up when you search it turns out the dongle I'd been using for ages was actually some variant of 3G that the big switchoff made non-functional. Well it did come from e-waste, which is where it'll go back to. I've got an otherwise usable phone with the same problem.

This prompted a quick panic order of a Waveshare SIM7600G-H dongle from PiHut. There's a certain clunkiness to it as it's intended for industrial/hobbyist use rather than consumers but that at least means no weird gimped branded up firmware and at least some technical information on their Wiki.

Getting it working was definitely not a consumer job, sending AT commands over a USB serial port and then having to reconfigure Network Manager in Raspbian to not set the DNS servers: another frustrating half day rabbithole but with it configured it connects quickly and reliably. The external antenna probably helps.

As it's also possible to use this via an onboard UART I may see if I can use this from embedded hardware like an ESP32 but that's a project for another time.

Sticking it in a box

The new dongle and external antenna meant there was no way the original enclosure where I repurposed an external mains socket box was going to work any more.

So I settled on using a 9l "Really Useful Box" and 3D printed a mounting plate for it all. There's also a fascia with a status LED, a button to shutdown/restart it and some places to cable-tie the cables in place to stop them getting yanked out of the internals. The box isn't properly waterproof long term but will stand use outdoors for the couple of days at a time that we need it.

All the external leads are hugely long. It's powered from a 12v lead-acid battery which needs tucking away somewhere safe and the PMR used to transmit needs some height to help with coverage and ends up tied to a pole high up.

Sometimes the wrong thing is the right thing

Once I'd reached this point of it working reliably and was thinking about how we'd use it in the game it popped into my head we could use What3Words to send the player group directions.

I'm no fan of this attempt to do corporate capture of something there should be an open standard for (there is one but it is a tad clunky) and the failings of their word choice algorithm for safety critical situations have been explored extensively by people smarter than me. However in this case, smacking the W3W app onto the tablets the players were already carrying and then sending locations into the chat as a clickable link that opened the app was a fair choice and we'd used it a little in the past.

Until the event I didn't even get to test it, and when we started using it the "/send" option where MU|TH|UR didn't read out the words was needed because otherwise it was a tide of unintelligible blah when we forgot.

Much as I have reservations about W3W it worked mostly OK for this, only once sending them in completely the wrong direction which was probably a GM mistake, and I think we'll be using this again next year.

Want to build your own?


I've now backed this all up and once I've had time to write an "installer" of sorts I'll update the previous instructions on GitHub.

Looks like love at first sight to me

Recently we finished up our four-episode LARP series, High Frontier: Gods and Monsters, which has been stuck in my consciousness ever since mid-2019. The pandemic delayed the first episode but we've run one episode a year since 2022 and it felt like I always had something for it on my to-do list.

Despite being set in our variant of the Alien/Prometheus universe we had not so far featured any Xenomorphs in the game and that was about to change.

An obvious way to signal this in advance is to feature the iconic visual of a Facehugger in a huge glass tube. I've been meaning to make one of these for years and had an earlier version that never really worked I junked.

Buying a large enough clear tube for the task was something I looked at over time but anything the right size was simply outside our prop budget. Knowing we really wanted this in the game I decided to bend a sheet of 3mm acrylic. How hard could it be?

Turns out it was quite hard.

I picked up a 1800x900mm 3mm acrylic sheet and used this halved as my basis to scale everything else, allowing me to make two tubes.

Not being an RPF level prop maker all my stuff just needs to look "about right". I always prioritise it being repeatably makeable and able to stand transport and handling by random people in the LARP.

You can bend acrylic with heat and last time I need to do larger pieces for ORAC I put them in an oven, which worked fantastically. Short of asking a local bakery nobody has an oven that's going to take square sheets this large. Which meant progressive use of a hot air gun was about the only option open to me.

Having done the calculation on the size of tube this would make it turned out I had a large cardboard tube close so I clamped the acrylic to this and repeatedly formed the sheets over this in a process that ended up taking a couple of days.

Meanwhile I found some reference photos of the original props and started doing a rough replica in CAD for 3D printing. There's a reason I own a large format bed slinger 3D printer, it's slow unfashionable and fairly low quality but it allows me to print larger items like this.

Some time back I had found a 3D poseable printable model of a Facehugger model and had printed all the parts for a couple as I'd planned to make two tubes. These ended up being really quite difficult to assemble even when following the printing instructions. The joints are super tight and even with careful printing on my newer printer and some sanding of the 'knuckles' they were prone to snapping when forced together. In the end I think I printed enough to make three and managed to get two completed ones.

I'd designed the top/bottom sections that hold the tube with a small groove in that should hold the acrylic into its tube shape and make the whole thing kind of seamless so as I got the first pieces off the printer I started to assemble things. Here I realised my mistake, I could see the tube wasn't perfect but 'almost round' and hoped constraining it into the printed pieces would even things out. Getting frustrated I tried to force it in and snapped a large corner chunk off, acrylic is quite brittle.

So we were down to one tube and I spent yet more hours trying to get that acrylic tube properly round.

The two Facehuggers got a rudimentary paint job. I'm a fan of heavy coats of generic DIY emulsion paint and varnish to cover layer lines on organic shapes and it worked out OK. The second Facehugger would still end up getting used laid out on a table.

The top and bottom sections got proper priming and sanding as they needed to look like metal close up.

When I came to fit the remaining tube, despite spending a long time bending it I still struggled to get it to fit, even with constraining it with straps and now realise I should have put a bevel in at least the inside of the slot it's supposed to fit otherwise it's just too hard to do singlehanded. With the LARP only a week away I didn't have time for a second costly mistake so I just taped the tube outside the top/bottom sections and up the back to cover the now large gap. I know it's not right but in the final analysis the players just saw a cool large prop so it did the job.

People with a decent memory of the original will see the control panel piece in the top section never got modelled and printed. I hit "perfect is the enemy of good" quite quickly once we were close to the event so I simply left it out. Now we're past it and I've got an interesting if huge prop to display in my house I think I'll go back and finish it up. I may even try to remove the tape and fit the acrylic properly, perhaps re-printing the round sections with a larger, tapered groove.

3D printed Data Slate props

For a long while I've been using old Nexus 9 tablets to act as 'cyberdecks' in our Cyberpunk LARP, but I was recently asked to dress them for a 40K themed one this summer.

The old 3D printed cases were getting long in the tooth and were clearly just unpainted poor quality 3D prints. So I started completely from scratch for this, only re-using my CAD model of what I needed to hold the tablet securely and operate the power and volume buttons on the side.

One of the major things I wanted to get away from was the obviously rectangular shape of the tablet screen. It's a common sci-fi trope for screens to be weird shapes and to emulate this I modelled a surround with truncated corners and cutouts for the cameras and speakers.

This looks great so long as the tablet is asleep, but once it wakes up the real shape of the screen is obvious. There's only so much I can do here and while I could have covered some of the usable area Android apps tend to quite rightly assume the whole screen is accessible.

On the old tablet holders I had added some old bag carrying straps, which are very practical but untidy looking so I added a very chonky carrying handle as part of the case.

This makes the whole thing physically large, which has the added advantage of making these hard to hide or just stuff in a bag. It's a not uncommon problem in LARP that acquisitive players will squirrel something away in their bag and it's never seen again unless they want to leverage it somehow. These were to have PDFs on them that were plot-relevant and we wanted that information very clearly available.

Annoyingly there's no open source 'kiosk mode' application for Android that I could find but to make sure the PDFs were visible whenever somebody woke the tablet I used the "Librera FD" viewer and the basic screen pinning functionality in Android to keep it maximised.

When asked to make these I wasn't sure how long the documents would be so I decided to add physical controls for paging through and searching documents. There's a scroll wheel, two buttons to page up and down plus a keyboard for text entry. This re-uses an X-Box 360 chatpad as making your own small keyboard keycaps that don't look terrible is very awkward and fiddly. There's also a piezo sounder to do keyboard/button bleeps.

This section is the part I'm least pleased with: the chatpad is too small and the buttons I ordered were too long to allow me to inset it like I did with the tablet section.

The design is ugly because I was rushing and I will most likely re-do this part before they are used again. I may even go as far as making a custom keyboard using tactile switches that fills more of the area.

These physical controls are driven by ESP32-S2 dev boards acting as USB OTG HID devices. I ran into a bit of a struggle with the code for this. Every time the tablet went to sleep, it would disconnect the USB devices and refuse to reconnect. I think this is related to this reported bug but was in a hurry to get this done so just made the ESP32-S2 restart whenever the tablet went to sleep. There is a little latency on waking it up but not a great deal. I would like to add more functionality to this setup, including my LoRa mesh network messaging stuff, so I need to overcome this problem. The 'cheat' would be to connect the ESP32 over BLE but given I have a direct physical connection to the tablet this sort of offends me and I'd need to swap to an ESP32-S3.

In the end though, this all worked out well, I got four of these made in different colours so they could be told apart and the paint weathering on the main body looks good. I didn't have time to weather the control sections so they just got some scratches but if I'm going to re-do them that's fine. I may also try to make some left handed variants and some without the big handle.

These will definitely be getting a load of use. Put Termux on them and they are almost 'real computers' and while the performance is poor in modern web applications we always curate what we let our players access. I've got a drawer full of Nexus 9s so printing and painting a few more of these over the next few months will get me a nice stash of usable props.


3D printing Lasertag lens units

For over a year I've been faffing with my own Lasertag PCB design but keep dropping the project when something else needs doing.

The PCB design seems OK but with a couple of poor decisions I'd fix were I to order more. The 'beta' software works so I fitted them in two of my own Lasertag weapons and one worked great but the other not so much. I think it's got two current limiting resistors because I didn't realise there was one in the existing lens unit already.

What I don't know was what the real potential of the board was with the component choices I'd made.

Having a board design sort of goes hand in hand with needing lens units to match and I want to do what Phil from UKLTA has done: design a re-usable 3D printed lens unit that can be included in larger things, or printed out to attach directly to conversions. This is especially true if I want to maybe make some 3D printed 40K themed weapons for our upcoming 40K LARP

I ordered some 25mm acrylic lenses a few weeks back and I've had a go at designing an adjustable 3D printed lens unit that uses them but what I really needed was a way to range test away from Lasertag events that didn't involve the Police being called on me. Being based in the UK this is a real concern. So last week I made up a 'gun on a stick' which looks nothing like a weapon apart from the attached sight.

Today I've done some testing at the Hackspace on the field and it's "good enough for The Grange" with no trouble hitting a target across the width field at ~140m.

Unfortunately this isn't really a good test as I arrived later than planned and the photos don't really show how much the light was going. I need to test again on a bright sunny day. Home is just a short walk from Wanstead Flats which is a huge area of common ground so I'll have to make a trip there when the sun is shining.

Good progress though.

Hackspace access control

I'm a trustee at East Essex Hackspace which is currently discussing buying a fibre laser and it's rekindled the desire for 'toolbots' to control access to things. Originally I was looking at this over a year ago but got busy with other things so shelved it and then the need suddenly seemed less urgent.

One of our challenges is that when we opened we used some Wiegand RFID readers for our door entry system and fed the UIDs they gave into our membership database. Later on we found out that these UIDs weren't the same as the UIDs other things reported. I did some fiddling around and realised a simple XOR and byte reshuffle that fixed this so we were back in business until I built something using this and found it wasn't right for some issued cards. 

Then the access control project got shelved.

Having dug out my access control mockup again I armed myself with a pile of cards that I know don't map IDs how I thought and quickly realised if they have a 7-byte UID then the byte order reshuffle is different than for a 4-byte UID. So we're potentially back in business.

For the hardware I've taken a bit of an executive decision on the basis that whoever does the work gets to say how it's done, otherwise endless bikeshedding occurs. The hardware will be based on an Olimex ESP32-EVB which is an ESP32 dev board with Ethernet, onboard relays and a bunch of hardware we probably don't need. They're reliably available and properly certified.

To add the RFID reader I've designed a little 'shield' that plugs into the UEXT connector on the EVB which I'll solder some cheap MRC522 boards to.

It also breaks out some GPIO and has LEDs and somewhere to connect a sounder. I'm not even sure if we'll use a sounder, but I just wanted to get the board ordered.

Work on the software has been ongoing for ages but I've started poking at it again and one of the other Trustees already did a bunch of stuff in our membership database so I'm hoping this project can get done without too much pain.

Each tool will have different ways of limiting its use but my expectation most will already have an interlock or emergency stop that can be connected to one of the onboard relays of the EVB. I'd not expect these devices to control the main power feed to the tool unless it's a very small one.

Hoverboard comms library

I'm back making silly moving things using hoverboard hub motors and re-flashed hoverboard controllers.

For months on end I've been vaguely putting off working on the big 6-wheel platform I started because I needed to write a library for the comms protocol so I wasn't committing the sin of copy & pasting great swathes of code to run the three separate controllers.

Now I've finally sat down and got round to it so the excuses for not progressing the big rover project are evaporating. I only started thinking about this two years ago.

MU|TH|UR setup script

I have now (mostly) documented/automated how to create a text-to-speech bot as recently used at our High Frontier LARP.

Instructions are here.

retroTerm release 0.1.6

At our recent LARP High Frontier: The Drake Objective I used retroTerm my ANSI/VT terminal GUI widgets library to create a prop where the players interacted with an offscreen extra-terrestrial intelligence through a purposefully retro computer interface.

This is the whole reason the library got written in the first place.

Work started on retroTerm in maybe 2019. Then the game it was scheduled to be used in got postponed due to the pandemic and despite the extra time that afforded me I didn't manage to deliver anything usable for the game when it finally happened.

It was a terrible case of overpromise and underdeliver, ie. I delivered nothing usable. The work on the retroTerm library itself was fine but the messaging system it was to provide the user interface for just wasn't stable and we abandoned it at the last minute.

When a short 'midqual' LARP event came up last year I rewrote all the messaging code and produced a version of the thing with a cut-down retroTerm user interface that saw a tiny amount of use. There were still some frustrating problems though: centred on it needing an accurate timestamp for all the messages and me getting caught out by GPS just not working for this. I had not realised the building it would be used in had a metal roof and the dubious signal ended up causing it to end up with spurious date & time values, some in 2080. Which is perhaps a failing of the GPS library I used to process the NMEA sentences but regardless this was not good and caused it to misbehave.

As a result when The Drake Objective was announced I made some new hardware that included a hardware real-time-clock and did a ton of work on making damn sure the setup would have a correct time. It couldn't just connect to WiFi and get it from the Internet as it'd be used in a building in a field with no services and also very dubious 4G signal we weren't sure would be usable.

The new hardware worked around the issues well and the whole prop behaved pretty well during a weekend long game albeit in its still quite cut down form.

Part of putting this thing together saw me make some improvements to retroTerm.

I found and squashed a memory leak[1] and have just improved the way it handles 'list box' widgets so I feel it's in a pretty solid spot. Today I fiddled around testing it on an ESP32 over Classic Bluetooth Serial rather than a wired connection and this worked trivially easily.

This is something I can imagine use cases for so I'm glad I finally tried it out. Often ESP32 projects get built with little captive web portals to configure/control them but this gets 'big' quickly. Being able to run a wireless retroTerm interface for this is something I'm going to try in an upcoming project.

Anyway this was all a big ramble to say retroTerm 0.1.6 is out and seems to be working well.

Next on my list is making that multi-user peer-to-peer messaging system I originally promised back in 2019 happen. Even if we never actually use it I want to have done it and to that end have been writing great swathes of code in preparation already which I've been sticking in some new libraries. When they're more finished I'll share them.

[1] Which only showed up if constantly updating something like a clock widget


You now have fifteen minutes to reach minimum safe distance

We have just run a sci-fi LARP where we wanted to have the classic trope of a computer with a sad voice telling the players bad news like MU|TH|UR in Aliens, GERTY from Moon, HAL in 2001 etc. etc. It's a very common part of the aesthetic of a certain kind of sci-fi.

Our game was set in the Aliens universe so we wanted to emulate the female voice from MU|TH|UR. None of the GMs are voice actors (or female) so I made a text to speech device for this.

I got quite far down the rabbit hole of power saving and solar charging on a Raspberry Pi 3A+ then somebody offered to bring a massive lead-acid battery to the game for me so I abandoned worrying about all that because brute force won out. I will come back to it though as I want to make a nice portable outdoor Pi to provide 'infrastructure' at future events. Having infrastructure I can deploy easily in a field with no power has been a constant thing I've been nibbling at the edges of for years mostly with ESP32s and mesh networking.

I put the Raspberry Pi 3A+ into a waterproof box I had and powered it off that big battery all weekend. I even forgot to shut it down on Saturday night and it jut kept going.

The Raspberry Pi communicated with the Internet over 4G using a dongle I had kicking around which conveniently has a tiny NAT router in and presents as a USB ethernet so 'just works' with zero configuration on the Pi, or pretty much anything else. I'll probably try find another dongle the same, it's handy for these reasons.

I then made a 'bot' in the popular messaging app Telegram using their example Python script and used the Microsoft Azure AI voice engine to generate a very convincing voice. This was not a very sophisticated script, really just Telegram's example bot script, their recipe for restricting access to certain Telegram IDs and Microsoft's example text-to-speech script all smushed together with my rudimentary understand of Python as I'm normally an Arduino/ESP32 C++ person.

None of this needs much processing power: an original Pi could probably do it, except the Microsoft library expects a 64-bit OS so the Raspberry Pi 3A+ was a good fit. It's the lowliest, most power efficient 64-bit Pi that also has an analogue audio out and I had one in my stash of dormant SBCs.

The end result was we could type a message on our phone into a Telegram group chat and it would then ring out across the game using walkie-talkies to broadcast it over a large area. There was a little bit of impedence/level matching needed for the line out from the Pi to go into the headset input of the walkie-talkie. I used voice activation in lieu of 'push-to-talk' but that too worked great once I added a preamble 'bong' and little gap before the talking. I may go back and investigate triggering the push-to-talk through the headset connector using one of the Pi GPIOs as it's more predictable and the headset has the feature: I was just bashing the thing together quickly for the game.

"You now have fifteen minutes to reach minimum safe distance"

If players wanted to talk to MU|TH|UR they would just talk on the same walkie-talkie channel and we were listening. We had some quite long player conversations back and forth with MU|TH|UR like this and it worked brilliantly. We'll be using this setup again.

m2mDirect v0.1.1 release

A long time ago I created m2mMesh, which was an Arduino library for a self-organising mesh network onESP8266/32 that allowed you to do machine-to-machine messaging.

This has been quite useful but sometimes it's overly heavyweight so I've written a simpler thing for direct links between two devices. Also with just two devices you can use the built in encryption features of ESP-NOW. Lack of encryption was always a concern with m2mMesh.

This new library is m2mDirect, which I intend to use for control/telemetry of the various rovers I've been working on.

It's not in the Arduino Library Manager yet as it needs more work, in particular ESP8266 support and channel negotiation, but it is now available on GitHub.

Obscure Arduino tips #5

Just today I spotted an excellent 'ease of use' thing in the Arduino IDE that Sparkfun had used in one of their examples. Maybe consider adding it to any code you are going to share.

There is a pseudo-URL you can add as a comment in code that will link to the Arduino Library Manager and search for a library.

For example

#include "SparkFun_TMF882X_Library.h" //http://librarymanager/All#SparkFun_Qwiic_TMF882X

This way if somebody has your code they can click on the link and be taken straight to an install option within the Arduino IDE.

This is a really nice little usability feature I had no idea existed.

I'll gloss over the fact Sparkfun originally typo-ed the link in the sketch in question. :-)

Trackable Lasertag sensor

As a partner piece to the PDT Tracker I needed to make some 'wearables' to go with it.

My original plan had been to take some of the PCBs made for the PDT Tracker and jury rig them into that wearable.

I did this in May but in the end the software wasn't ready for the event I needed them at and even had it been the game overran and we didn't get to the point where they were necessary.

So I've had a couple of months to come up with a wearable beacon and I decided to go for an MVP of my Lasertag 'holy grail' idea: a  Lasertag sensor that is remotely trackable and sends status updates.

I consider it a 'minimum viable product' because not only is the software a first attempt it relies on external modules for some of its features.

All the PCB has on it is an ESP32-C3 WROOM module, RFM95W LoRa module, LDO voltage regulator, a few passive components and solder headers for various things.

The GPS will always be a bought in module but relying on an external USB breakout, LiPo charger and sounder makes it bulkier than it otherwise might have been. I also put the components all on one side for easy soldering which gives it a fairly large 'footprint'.

Initial desk based testing with the board you can see above showed everything to work so I designed a quite utilitarian 3D printed enclosure and assembled four headband style sensors to test.

Convention in UKLTA is that sensors are worn on the head and this prototype ended up slightly bulkier than the commonly used sensors but with a LiPo inside rather than 3x AAA batteries it was no heavier.

Getting everything inside the case was fairly easy but construction of the headband which includes four IR sensors and four 3mm LEDs was quite tiresome. I'd opted to make little 3D printed enclosures for these and this really exacerbated struggles with getting the wiring done tidily.

In the end this all worked so I'm going to improve on the software between now and our next event in May 2024. I might do a second revision of the PCB with more functionality on-board but without a clear requirement for the system yet the four prototypes I have work and can be used to further test the concept.

One of the things that didn't get tested is haptic feedback, mostly because I was rushing and I didn't have a nice compact vibration motor to use. It's planned though as one of our members is hard-of-hearing and also I really like the haptic feedback in the Laserwar equipment I use at another LARP.

So far this post has been all about the process and the componentry but here's the concept I'm trying to realise.

  • Every participant in a LARP is location tracked, players, crew and 'monsters'
  • The 'health' of every participant in the LARP is tracked
Obviously this only makes sense in an outdoor LARP with an element of tactical combat but that's what I play.

The purpose of this is essentially to allow us to replicate the sort of thing you see in action sci-fi media where there are one or both or some combo of the following two things.
  • A 'tracker' that shows the relative location of friends/foes to players eg. the Alien/Aliens motion tracker
  • A 'squad status' system for squad leaders eg. the 'command desk' in the APC in Aliens that shows the 'health' of the squad.

This is all very mil-sim industrial sci-fi stuff but that's what I want from my games. In principle it should also be able to link the sensor to my prototype Lasertag weapon board using Bluetooth and show when a participant is firing, out of ammo etc.

I would also love to partner it with my HelmetCam prototype for the full Colonial Marines experience but the challenges of WiFi outdoors may make that impractical.

These ideas are taking a long time to come to fruition but I am slowly edging towards them. I bought the GPS modules used in this back in 2020.

eBike battery mount

Way back at EMFCamp I bought an eBike battery to use in a Rover. It came bare without a connector or mount. It took me a long time to get around to searching for a connector and ordered something from AliExpress.

When it arrived it was a disappointment. The connector was just about OK but the mount was rubbish and unusable.

Yesterday I finally got around to designing a 3D printed block to go on the supplied rail and hold the connector firmly in place, unlike the awful flimsy plastic pieces supplied.

I also had to drill the rail to make the locking mechanism work, but that came out OK.

Now I need to get on with the rest of the Rover.

GalactiNet GT420 terminal

Back in May I was part of a team running a short LARP in our High Frontier universe.

The game plot called for the existence of a prototype communication device through which 'second contact' with an advanced extra-terrestrial species was being attempted.

In practical terms the intention was there would be a short exchange of messages between the players and these extra-terrestrials while very human chaos raged around them.

We like to do things with 'practical effects' at High Frontier and avoid whispered messages from GMs and the led me to somewhat overcomplicate the prop involved. A lot of this was because we intended to have an multi-user in-game messaging system at our previous event and I flamed out trying to deliver it in time, resulting in a big disappointment.

So this game I very much wanted to make that happen even if the actual amount of messaging would be trivial.

Every player was provided with a personal printed RFID card and inserting the card into a reader in the external unit logged them in.

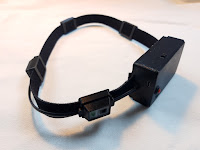
The physical prop was made in two large chunks: a 'terminal' and the actual 'communicator' itself. Making these physically imposing yet still portable props was deliberate as the players would be faced with carrying them while under fire or abandoning them.

The 'terminal' is an old laptop motherboard and screen carefully fitted into a medium sized flight case with 3D printed and painted fascia. The flight case was interestingly laid out with a padded compartment on one side and I retained that for storage of a compact keyboard, mouse, cables and the power supply enabling it all to be packed down for moving.

Building this took a fair amount of iteration and improvisation. The original laptop battery pack was beyond use so I built one out of new 18650 cells with double the original capacity to ensure it would last the entire game.

Making an aged laptop bearably usable is an increasing struggle and the Raspberry Pi desktop for x86 is my go-to for this. By removing the Office software before updating you can still squeeze it onto 8GB SSDs and so long as you don't want to use Chrome with super-bloated sites performance is as zippy as it can be.

All it needed to do was run PuTTY as like my previous work on off-grid multi-user messaging this was a 'microcontroller first' design, implemented on ESP32-S2.

I took my previous, frankly unmanageable, project for messaging and created a new back end for it this time based around the port of sqlite available for ESP32. My goals were far more modest than the original project in UI terms but the back end still has most of the features to now resurrect it in what I hope is an actually manageable fashion.

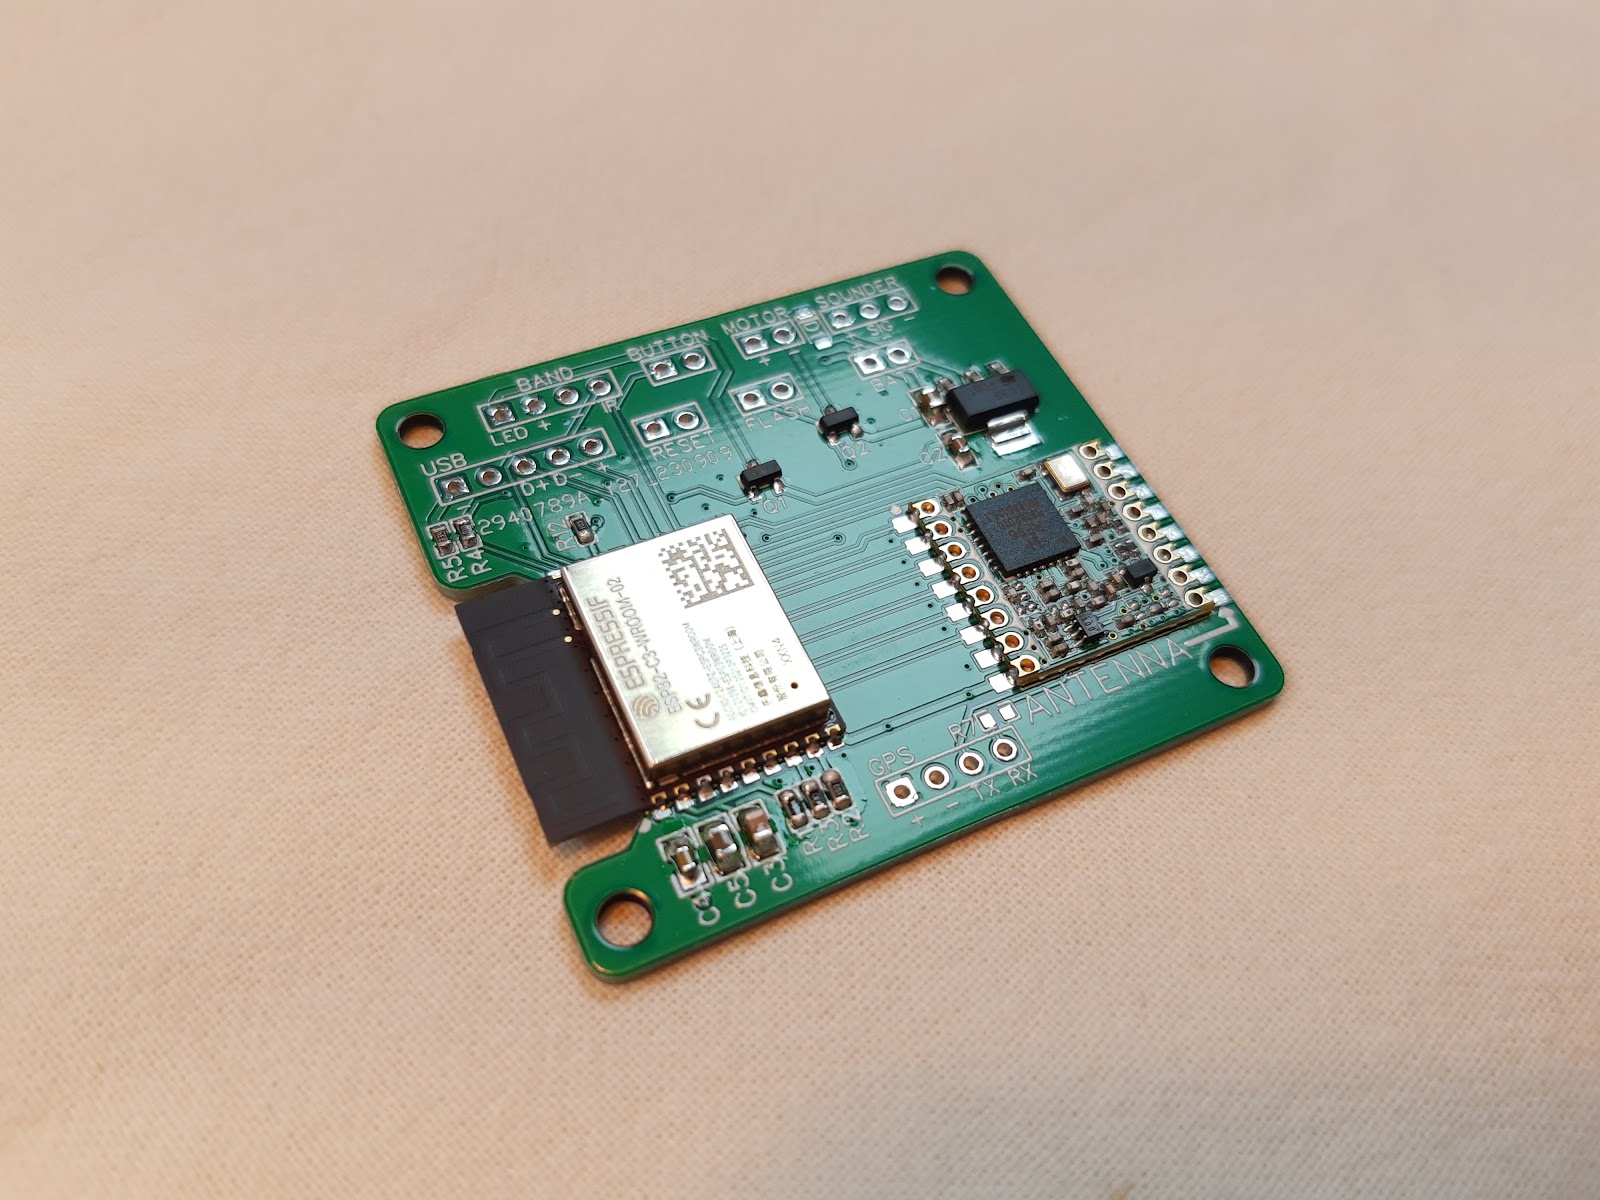
Inside the communicator itself is a custom PCB I made a small batch for as long term I want to develop and use this messaging system for future games. It uses the ubiquitous MRC522 RFID reader and has a GPS attached for getting an accurate time signal, which is necessary for the system to work. There's also a uSD socket for storage (although it could use LittleFS), a sounder and some indicator LEDs.

By the time I was actually coding things for the game I realised I'd made some omissions on the PCBs but broadly they worked.

While the players interacted using a retroterm UI on the physical terminal, GMs could connect over WiFi and use a hacked together web interface to view previous messages and send new ones.

I did start by writing a fully featured web interface but the framework I used meant the ESP32 began to run out of memory once there was a non-trivial number of things in the database. Moving things into PSRAM helped, but not enough realistically.

The sqlite cache also caused me grief as it would rapidly eat all the heap memory of the ESP32, despite nominally being able to manage that itself. Tweaking compile time constants helped but in the end I found I had to aggressively clear the cache using the sqlite API after every interaction. By this point I was very close to the game, stressed about the deadline again and as messy as this solution was it worked well.

Using GPS for time, even indoors, worked well in testing but was another cause of stress on the day even though we're nominally an outdoor LARP system.

A cold GPS start, metal roof on the building used and need for it to work quickly ended up with us having to leave the communicator outside the building on a long USB lead for it to work at all.

I will not wholly rely on GPS for time again and look to fit a dedicated RTC that is set then updated by the GPS only if necessary. Even outdoors the time signal seemed unreliable but it was impossible for me to troubleshoot at the game. This meant weird slow performance and trouble logging on that I simply hadn't seen in testing.

In the end though, messages were exchanged and this massively overcomplicated setup delivered even though it gave me and the rest of the game team huge amounts of stress.

What I need to do now is work on it in the in-between times so that the back end approaches plug and play for other applications and my 'microcontroller first' plan actually means it can be used across a range of lightweight devices.

There was a whole PC doing almost nothing in this setup that could have done the messaging instead but my plan is this 'backwards' approach would allow cheap ESP32-based props to interact with the system.

You can buy something that could in principle be turned into a pocket touchscreen communicator for <£10 and I plan to pick up a couple. It's just the tip of the iceberg of what you can do with little ESP32 based gadgets. Previously I was thinking to use M5Stack/M5Paper products as well.

The messaging back end I've christened backslang and is on GitHub but I would say it is very much an unfinished mess not fit for anybody else to use. Maybe I'll find time to fix this before our next event. I'd love other people to dive in to the repo and fix my naïve mistakes but it seems unlikely anybody will have the inclination and time.

Adding MilesTag to my Arduino Lasertag library

I have for quite some time been attending LARP where Lasertag is used for the combat system. I now participate in games which have two incompatible systems, the UKLTA which uses a proprietary development (Data-over-Tag) of the early Worlds of Wonder system and Humanity Ascendant which uses commercial equipment from the Russian company LaserWar. LaserWar is compatible with the MilesTag system with a few additions for game admin.

For quite some time I've wanted to have a play with time LaserWar kit to see if I can throw some code together that works with it and I finally got round to borrowing some.

MilesTag is simpler than DoT and it didn't take long to update my Arduino library for doing Lasertag so it can both send and receive Laserwar/MilesTag hits. Sending LaserWar game admin codes would also be possible, they're just differently formatted, sometimes longer IR packets.

Sadly I can't make this open source as the packet format for UKLTA DoT is proprietary, but I might strip out the MilesTag parts separately.


LARPCon 2023 interview

 I was at LARPCon 2023 with some of my old props that make good table pieces and got interviewed by LARPBook. There's a small amount of cringe in my off the cuff talk but broadly it's OK.